
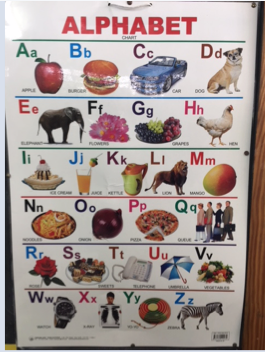
Take a look at common alphabet charts and think about the children in your classroom. Do they have the experiences or language background needed to connect each letter with the picture shown? Often, they don’t.
There’s no such thing as a “universal” alphabet chart. Children come to school with diverse personal, cultural, and language experiences—and those differences matter.
When a child sees a picture they know as a chicken labeled H, a flower labeled R, or spaghetti labeled N, it’s logical for them to connect the letter to the word they already know. When that happens, the chart misses its purpose: helping children link letters to beginning sounds.
Aa Is for More Than Apple
Instead of static charts, we can create living alphabet displays that reflect children’s real lives.
- Create a shared space: Post large alphabet cards at child height and leave space to add images connected to children’s experiences.
- Go on “Walk and Talks”: Explore your school or community and photograph or draw objects tied to different letters. Remember, a child’s drawing—or a student-generated image—can be just as meaningful as a polished illustration.
- Teach with the chart: Build phonological awareness and phonics lessons around the images children help create.
- Let it grow: Add images over time and reinforce the connections between the names of objects and their initial sound.
- Connect across the curriculum: Include words from science, social studies, the arts, and math to expand sound-symbol understanding and vocabulary.
Note: For tricky letters like X, focus on how the letter works in words like box or exit rather than unfamiliar images that don’t reflect the sound.
Finally, remember that each child brings a unique language history. Pair your classroom chart a personal thesaurus, to support connections between Home Language and Standard English.
When classroom alphabet charts reflect children’s real-world experiences, they do more than teach letters—they honour identity and make literacy meaningful from the very start.
——————————————–
Beyond the Apple Discussion Guide
Rethinking Alphabet Charts
Goal:
Explore ways to make early learning instruction meaningful, inclusive, and reflective of students’ real-world experiences.
- Warm-Up / Opening Reflection
Questions to Consider:
- What images are used in your current alphabet chart?
- Which letters or pictures might be hard for some children to connect to based on their experiences or language background?
How do students’ personal, cultural, or home language experiences influence their understanding of letters and sounds?
Activity:
- Look at a traditional alphabet chart.
- Identify 2–3 letters where the picture might not be meaningful to all students.
- Share your observations with a partner.
- Understanding the Issue
Questions for Discussion:
- What does it mean that alphabet charts are not “universal”?
- How could traditional images hinder children’s letter-sound connections?
- Can you think of a letter that often confuses students? How might you teach it differently?
- Exploring Alternatives
Questions for Discussion:
- How could students help create a living alphabet chart?
- What classroom activities could reinforce the letter-sound connection using student-generated images?
- How could you use multiple subjects to enrich the chart?
Activity:
- In small groups, sketch a “living alphabet chart” for your classroom.
- Choose letters and objects familiar to your students.
- Plan how the chart could grow over time.
- Practical Implementation
Questions to Guide Planning:
- How will you collect objects, photos, or drawings from children’s lives?
- How will you integrate these into phonics and literacy lessons?
- How can a personal thesaurus help connect students’ home language to Standard English?
- Wrap-Up / Reflection
Discussion Questions:
- How might a living alphabet chart impact students’ engagement or sense of identity?
- What challenges do you anticipate, and how could you overcome them?
- What is one concrete step you will take in the next week to make alphabet instruction more inclusive?
Tips:
- Encourage real student examples; focus on meaningful connections, not perfection.
- Emphasise gradual growth of the chart—students’ contributions over time matter most.

