Exit slips are flexible, low-stakes, high-impact formative assessments that provide meaningful feedback between students and teachers without relying too heavily on tests.
Why Use Exit Slips?
Reduce testing fatigue: Frequent tests can exhaust students and consume valuable teaching time.
Reveal student thinking: Brief written, oral, or visual responses offer immediate insight into understanding.
Support growth: Used throughout a unit, exit slips encourage reflection, feedback, and progress monitoring.
Work across subjects: Exit slips can be adapted to any grade level or discipline.
Beyond the Apple: How Exit Slips Work
Former junior high teacher Paul Healy shared this approach, which can be adapted for any grade level.
Create a booklet: At the start of a unit, give students a booklet with four response options per page, based on daily or weekly readings, discussions, and course content.
Offer choice: Assign a response option or let students choose the one that feels most meaningful.
Collect responses: Gather booklets at the end of each lesson.
Provide feedback: Offer written or oral feedback before the next lesson.
Set high expectations: Establish clear expectations for depth of thought from the outset.
Sample Exit Slip Prompts
Students might respond to prompts such as:
I’d like to learn more about…
This discussion shifted my thinking from… to…
This information connects with…
My partner and I think…
This sketch shows what I learned…
I’m not sure about…
This reminds me of a song, movie, or sport…
This is important because…
I’m still wondering about…
The picture this creates in my mind is…
These puzzle pieces show how this connects to prior learning…
Scoring and Feedback
Teacher feedback may be written or oral and should reflect the depth of student thinking.
A– to A+: Perceptive, Critical thought: Deep connections, original insights, critical questions, and broad perspectives.
B to B+: Thoughtful, Thorough, Engaged: Clear connections, sustained engagement, and solid understanding.
B– or below | Resubmission Suggested: Surface-level understanding or limited engagement with the content or peers.
Using Exit Slips Mid-Class
Quick (1–2 minutes) check-in before a break.
Exit slips offer immediate insight into student thinking in concise written, oral, or visual form.
Provides teacher with insight into student thinking throughout the lesson; allowing responsive adaptions to the lesson
Language learning depends on establishing a familiar context. Once learners can identify with the context, they can build on known words and language structures.
Mime It / Talk About It is one way to do this. This learning strategy is useful for building vocabulary and language structures in a known language or in an additional language. Here’s how it works:
Mime a daily activity with a twist. For example:
Take a drink of water … that tastes awful
Open a door and walk in … and trip over something
Begin to tear a piece of paper … but it won’t tear
Read a book … and laugh uproariously
Stir a pot of soup … that suddenly becomes too thick to stir
Talk about it: Encourage students to talk about what they observed in the mime.
Revisit the mime in short “episodes”: For each episode, highlight vocabulary most useful to the group. Contrast new words with known language and record their learning in a personal thesaurus. To support understanding and memory, encourage students to add illustrations.
Invite students to mime. Provide opportunities for students to create and act out scenarios, then share both their known and new language.
Cultural identity is complex and layered, shaped by race, gender, socioeconomic status, community, sexual identity, ethnicity, religion, and more. Recognising this complexity is essential for creating classrooms where every student feels valued, respected, and empowered to learn and thrive.
Building culturally inclusive classrooms may require us to rethink familiar practices and shift our mindset. It means changing how we understand, respect, and engage with each learner.
That shift begins with three key changes:
From seeing culture as a single story to understanding it as lived experience.
From top down pedagogy to inclusive engagement.
From judgement to curiosity and exploration.
Respect at the Centre
Culturally inclusive classrooms are grounded in respect. They recognise what Louis Moll calls the funds of knowledge—the valuable knowledge, skills, and experiences students bring from their homes and communities. As Moll explains, these are assets to build on, not barriers to overcome and the practice of using the fund of knowledge can be adapted to the teacher and contenx in which they teach.
Teachers bring this to life by:
Building on the known. Learning about each student’s experiences and using them as a foundation for new learning, scaffolding from the familiar to the unfamiliar (Marie Clay).
Maintaining high expectations. Monitoring progress, responding to students’ needs, and adjusting teaching when learning stalls.
Making Space for Student Voice
Inclusive classrooms invite meaningful discussion across the curriculum. Students are encouraged to share their perspectives, listen respectfully to others, and connect new learning to their lives, communities, and the wider world.
When students feel heard and valued, engagement deepens and learning becomes more meaningful.
Using Cultural Knowledge with Purpose
Cultural knowledge isn’t an add-on; it belongs in every subject. Teachers can connect students’ experiences and community stories to curriculum learning in creative, purposeful ways.
For example, the story of a local athlete might open up learning in mathematics, physics, reading, or interdisciplinary projects. These connections affirm students’ identities while introducing new perspectives and possibilities for pedagogy and lesson planning.
When learning reflects who students are—and who they are becoming—it feels relevant, respectful, and real. For students who struggle to connect with school, this can be the key that opens the door. Here’s an example: Scroll to the 10:30 marker: https://www.youtube.com/watch?v=NX9xcGv9Hck
A Reminder
Culturally inclusive classrooms aren’t built overnight. They grow through intentional reflection, responsive teaching, and purposeful action—all grounded in respect and high expectations for every learner.
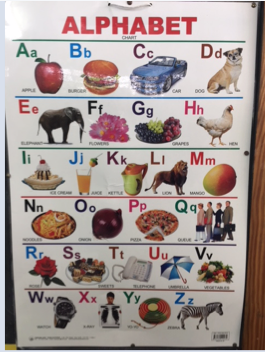
Take a look at common alphabet charts and think about the children in your classroom. Do they have the experiences or language background needed to connect each letter with the picture shown? Often, they don’t.
There’s no such thing as a “universal” alphabet chart. Children come to school with diverse personal, cultural, and language experiences—and those differences matter.
When a child sees a picture they know as a chicken labeled H, a flower labeled R, or spaghetti labeled N, it’s logical for them to connect the letter to the word they already know. When that happens, the chart misses its purpose: helping children link letters to beginning sounds.
Aa Is for More Than Apple
Instead of static charts, we can create living alphabet displays that reflect children’s real lives.
Create a shared space: Post large alphabet cards at child height and leave space to add images connected to children’s experiences.
Go on “Walk and Talks”: Explore your school or community and photograph or draw objects tied to different letters. Remember, a child’s drawing—or a student-generated image—can be just as meaningful as a polished illustration.
Teach with the chart: Build phonological awareness and phonics lessons around the images children help create.
Let it grow: Add images over time and reinforce the connections between the names of objects and their initial sound.
Connect across the curriculum: Include words from science, social studies, the arts, and math to expand sound-symbol understanding and vocabulary.
Note: For tricky letters like X, focus on how the letter works in words like box or exit rather than unfamiliar images that don’t reflect the sound.
Finally, remember that each child brings a unique language history. Pair your classroom chart a personal thesaurus, to support connections between Home Language and Standard English.
When classroom alphabet charts reflect children’s real-world experiences, they do more than teach letters—they honour identity and make literacy meaningful from the very start.
——————————————–
Beyond the Apple Discussion Guide
Rethinking Alphabet Charts
Goal: Explore ways to make early learning instruction meaningful, inclusive, and reflective of students’ real-world experiences.
Warm-Up / Opening Reflection
Questions to Consider:
What images are used in your current alphabet chart?
Which letters or pictures might be hard for some children to connect to based on their experiences or language background?
How do students’ personal, cultural, or home language experiences influence their understanding of letters and sounds?
Activity:
Look at a traditional alphabet chart.
Identify 2–3 letters where the picture might not be meaningful to all students.
Share your observations with a partner.
Understanding the Issue
Questions for Discussion:
What does it mean that alphabet charts are not “universal”?
How could traditional images hinder children’s letter-sound connections?
Can you think of a letter that often confuses students? How might you teach it differently?
Exploring Alternatives
Questions for Discussion:
How could students help create a living alphabet chart?
What classroom activities could reinforce the letter-sound connection using student-generated images?
How could you use multiple subjects to enrich the chart?
Activity:
In small groups, sketch a “living alphabet chart” for your classroom.
Choose letters and objects familiar to your students.
Plan how the chart could grow over time.
Practical Implementation
Questions to Guide Planning:
How will you collect objects, photos, or drawings from children’s lives?
How will you integrate these into phonics and literacy lessons?
How can a personal thesaurus help connect students’ home language to Standard English?
Wrap-Up / Reflection
Discussion Questions:
How might a living alphabet chart impact students’ engagement or sense of identity?
What challenges do you anticipate, and how could you overcome them?
What is one concrete step you will take in the next week to make alphabet instruction more inclusive?
Tips:
Encourage real student examples; focus on meaningful connections, not perfection.
Emphasise gradual growth of the chart—students’ contributions over time matter most.
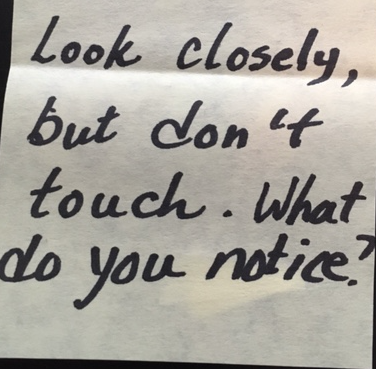
Set the tone for learning by posting a note on the classroom door:
When students enter this classroom, a wondering prompt such as an image, soundscape, or object invites them to look closely and use their senses and background knowledge to problem solve.
Here’s an example of how to set up a wondering prompt:
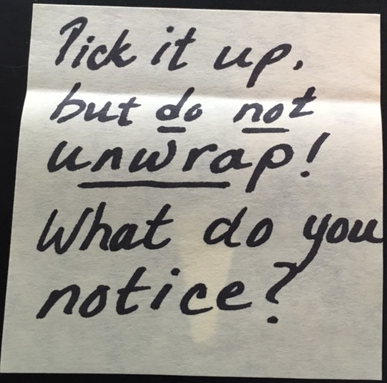
Wrap an unusual object and place it on a table with a note:
As the students look closely and gather information about the object, open the door to problem solving a bit wider.
Listen as the students share ideas about the shape, the hardness, the thickness, or the scent.
Note: This is a great opportunity for formative assessment of each student’s oral language, background knowledge, problem solving, so listen closely and take notes.
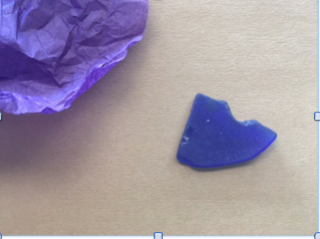
Next, invite the students to unwrap the object and encourage them to extend their ideas with prompting questions such as:
What do you think this is?
A long time ago, this object had sharp edges. How do you think the edges become dull?
This was found on a beach, how do think it got there?
This object comes in other colours. What other colours do you think you could find?
What could you use this object for?
NOTE: If you’re not sure what this is, click here.
Now, the wondering prompt becomes an anchor for a lesson. The subject of that lesson is up to you – it might be science, language arts, or history – the choice depends on how you feel this object connects to the next steps of the students’ learning.
From an opportunity to wonder, many lessons are born. And it all starts by taking a close look.
—————————————
Beyond the Apple Discussion Guide:
Using Wondering Prompts to Foster Curiosity
Purpose:
This session is designed to help educators reflect on ways to spark curiosity, support problem-solving, and assess students’ oral language and background knowledge through wondering prompts.
Session Overview
Set the Context – Introduce the idea of wondering prompts as a strategy to invite your colleagues to experience the curiosity and close observation described in the post above.
Examine an Example – Review a sample wondering prompt setup with an object, image, or soundscape.
Discuss Practice & Reflection – Colleagues share ideas, reflect on potential challenges, and plan classroom applications.
Connect to Learning Goals – Explore how curiosity can anchor lessons in different subject areas.
Step 1: Opening Discussion
Prompt: “Think about a time when a student noticed something unexpected or asked a question that led to deep learning. What conditions helped that happen?”
Discussion Questions:
What does it mean to “set the tone for learning” in your classroom?
How do wondering prompts create a space for curiosity and problem-solving?
Why is it important to observe student thinking before revealing answers?
Step 2: Explore a Wondering Prompt
Example Setup:
Wrap an unusual object and place it on a table with a note.
Invite colleagues to notice: shape, texture, color, scent.
Listen to their observations and ideas before revealing the object.
Reflection Questions:
What kinds of thinking are revealed in this moment?
How could you use these observations to guide next steps in instruction?
What formative assessment opportunities do you see in this process?
Step 3: Extend the Wonder
Example Prompts for Colleagues:
What do you think this is?
How might this object have changed over time?
How did it get here?
What could it be used for?
Discussion Questions:
How do open-ended questions encourage problem-solving and critical thinking?
How might you scaffold this for students with varying levels of background knowledge or language skills?
How can these prompts connect to inquiry-based learning in your content area?
Step 4: Connect to Instruction
Reflection Questions:
How could a wondering prompt anchor a lesson in science, language arts, or social studies?
How do you balance guiding students and letting them explore independently?
What are some examples of objects, images, or soundscapes you could use in your classroom?
Step 5: Takeaways & Next Steps
Action Planning:
Identify one wondering prompt you could try this week.
Plan how you will capture student observations and use them to guide the next steps in learning.
Discuss strategies for sharing results with colleagues to refine practice.
Key Ideas for Professional Reflection:
Wondering prompts foster curiosity, observation, and problem-solving.
Listening closely provides insight into students’ knowledge and thinking.
A small moment of wonder can anchor multiple subject lessons.
Collaboration with peers enhances idea generation and application.
Let’s begin with my personal reflections of my children as emerging writers:
My son:
My son’s first story consisted of a series wavy lines and curlicues written in black marker across the back of a leather sofa. Upon completion, he declared, “Look! I wrote my story in grown up writing!” (For those of you who are wondering, yes, it was a permanent marker.)
With great pride, he read us his story. As he pointed to each “word” he shared an action packed and well developed account of Spiderman’s most recent adventure. While the writing itself was unreadable to anyone else, every other trait of writing was there: ideas, organisation, voice, word choice, sentence fluency. It was clear that my son was a writer – he just had to learn how to share his stories with others. As a mother, I hoped that the formal school instruction in spelling, spacing, and letter formation wouldn’t overshadow his enthusiasm for writing stories.
My daughter:
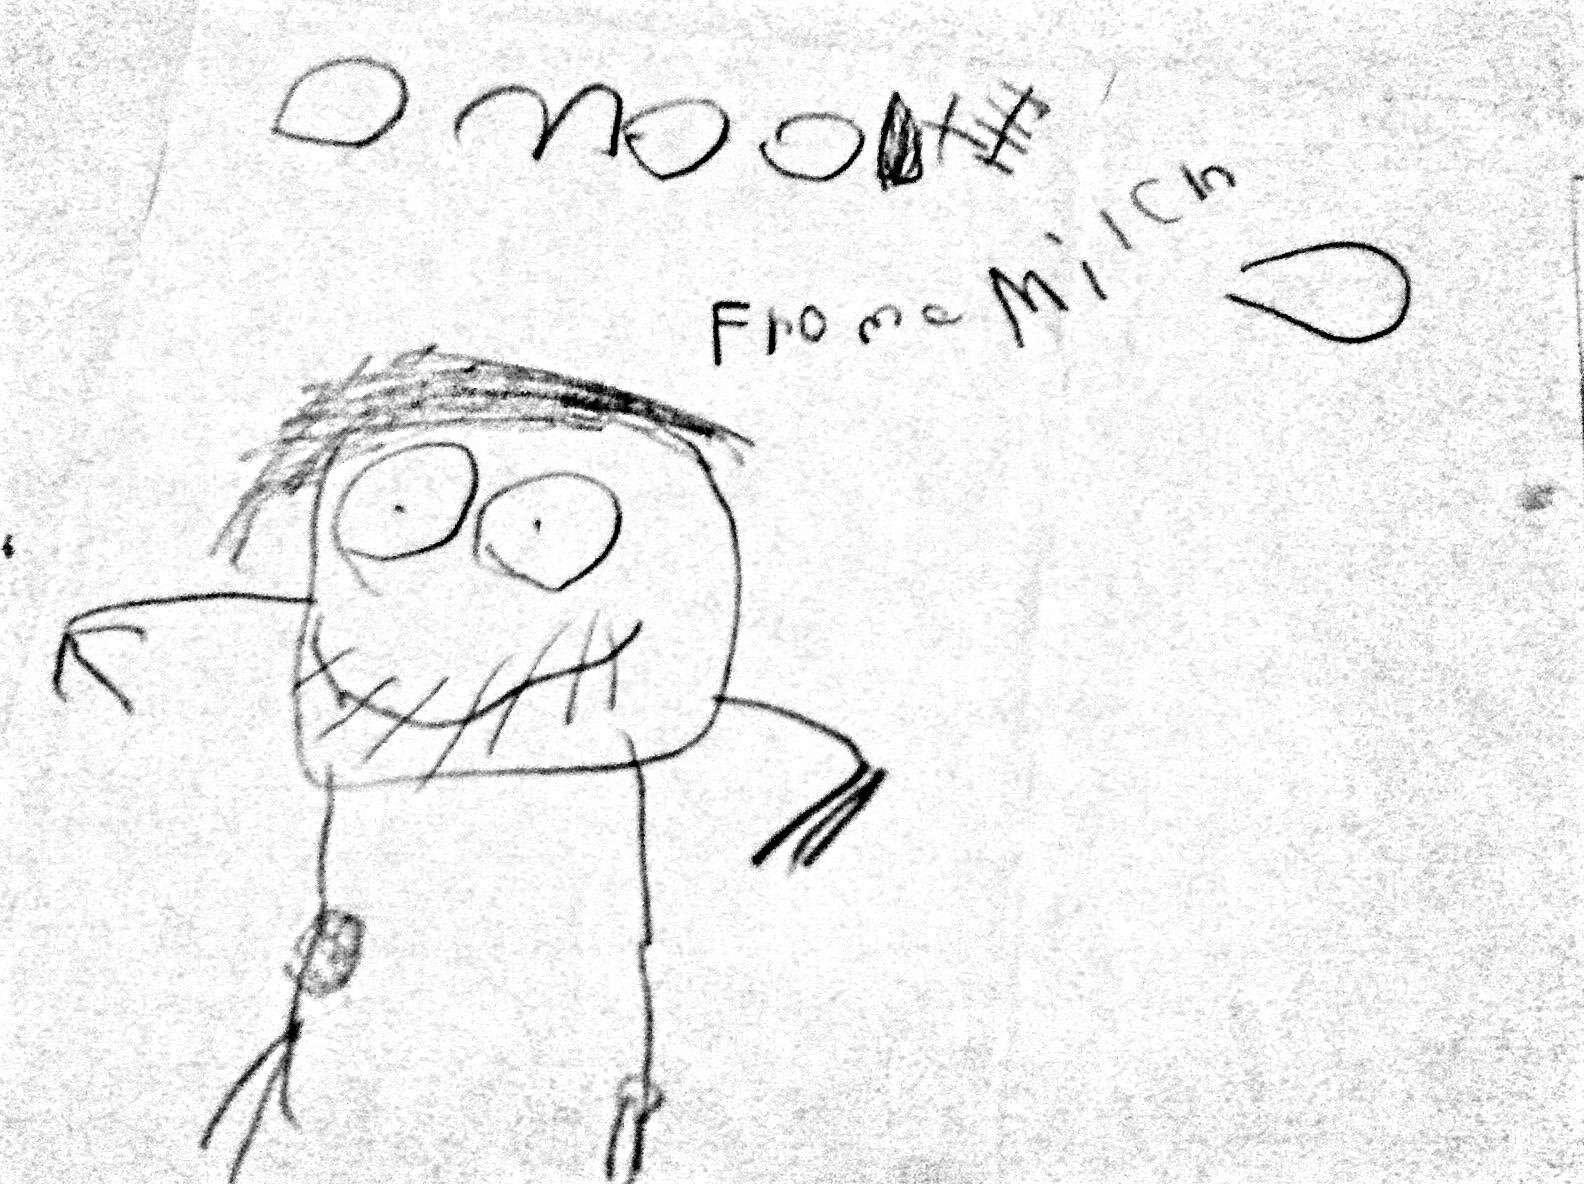
My daughter’s first piece of formal writing, a letter to her dad – wishing him a speedy recovery from knee surgery – survived:
I think you’ll agree that my daughter’s letter provides the reader with a clear sense of the event, the details of the event, and the impact of the event. (And yes, that’s just what her dad looked like when he came home from the hospital.) She was also using some of the conventions of text – a greeting at the top of the page:
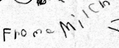
and a closing:
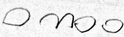
This somewhat misplaced grouping of letters:
is actually evidence of an almost correct spelling of her name, which is Michèle. (Yes, her name is presented on two lines rather than one, there are a few extra horizontal lines in the “E”, but she had a clear sense of using letter shapes to share her ideas)
Michele was also editing her work, which is clear when she realised she’d made a mistake:
.
Young children are writers
The point of this is: as children begin drawing or using some form of letters to share their ideas, they are writers. Early years teachers acknowledge these these early can dos, encourage more exploration, and provide timely guidance focussed on the next steps:
1. Begin with talking about the story:
Ask them to read the story to you and listen carefully.
Respond to the reading with questions about the details.
2. Provide feedback about the can dos:
the content of the story
some element of the conventions (letter formation, spelling, spacing, etc.) that is developing well
3. Keep notes focussed on the known and next steps. When the time is right, use these notes to plan the next lesson that builds on these accomplishments.
The process described above is not only student responsive, it’s recursive. While the examples above illustrate the youngest of writers, this responding and feedback loop provides the foundation for writing instruction throughout a person’s writing career. Learning to write takes time, practice, instruction, and ongoing feedback about what’s been accomplished and what’s next. Effective support maintains the early joy of sharing a story by focusing on the student’s learning, interests, and voice.
Is spelling important?
One key point to consider: Correct spelling is a component of good writing, not a definition of good writing, so encourage children to explore and develop their ideas through interesting word choice and sentence structures as they learn how to spell.
HINT: Using a rubric to search for evidence of writing
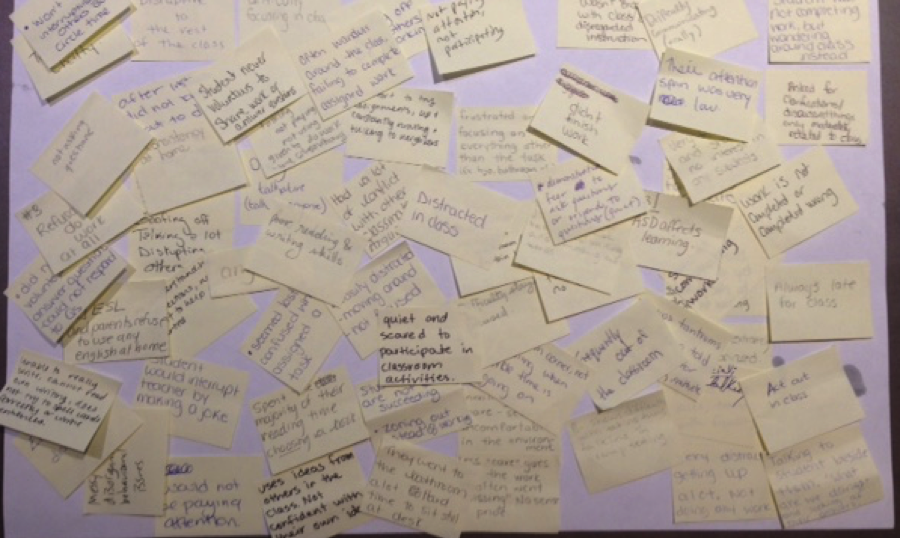
At the beginning of a recent professional learning session focussed on re-engaging disengaged students, we asked participants to use a post to describe a disengaged learner using just a few words.
As participants had coffee and chatted, we sorted the Post-its into two columns.
On the left, the comments focused on problems: distracted, late, incomplete work, disruptive, not focused, poor writing, interrupts the teacher, frustrated, leaves the classroom, frequent tantrums, has ADHD.
On the right, the comments focused on potential: thinks abstractly, strong communication skills, works well in quiet settings, easily engaged.
The imbalance was striking. Most of what we notice—and name—about disengaged students centres on what’s wrong, not what’s possible. It was a powerful reminder that we need to reframe our perspective on disengagement.
We know this matters. But in today’s busy, diverse classrooms, how do we do it?
Here are a few starting points:
Don’t make assumptions. Disengagement can happen to any student, regardless of background or past achievement.
Look beyond the score. Study student responses, not just grades. Even low marks reveal “the known”—what a student can already do.
Name strengths for the student. Keep it simple and honest: “I noticed you can… The next step is…”
Learn what matters to them. Regardless of the age or subject, a student’s known, interests and experiences are powerful entry points for learning across subjects. What does the student know about? What are they curious about? This information can inform units of study that integrate several subject areas. For example: If a student’s interest is hockey, the possibilities for lessons in various subject areas include: comparing scores, examining the physics of a body check, determining the economic impact of hockey on the family budget, comparative studies of sports throughout the world, reading fiction and nonfiction accounts of hockey players, and using the texts and language of hockey as anchors for reading, writing, grammar, word work lessons. The possibilities are limitless.
Design just-right challenges.
Create learning experiences that stretch students from what they already know to a point where they can see progress. This aligns with Vygotsky’s Zone of Proximal Development (ZPD), a recursive process that requires ongoing adjustment. This aligns with Vygotsky’s zone of proximal development (ZPD), a recursive progress that requires ongoing adjustment.
Stay focused on re-engagement. Set high expectations, monitor progress, provide feedback, and adjust pedagogical practice when learning stalls
Want to see how this shift looks in a real school setting? Click here.
Beyond the Apple Discussion Guide: Reframing Disengagement to Re-Engage Learners
Facilitator’s Note: The blog post for this discussion follows this Discussion Guide. Do not share the blog post until after Section 1 is completed.
Purpose This discussion guide supports educators in examining how disengagement is perceived, named, and addressed in classrooms. It encourages a student responsive mindset and practical strategies for re-engaging learners.
1.Opening Reflection
Prompt
When you hear the term “disengaged student,” what words or images come to mind?
Activity Option
Individually, write 3–5 words you associate with disengaged learners.
In small groups, sort the words into two categories: Challenges and Potential.
Discuss: Which category fills up faster? Why?
Read the blog post found at the end of this discussion guide.
Examining Our Lens
Discussion Questions
What stood out to you most about the balance / imbalance between the two Post-it columns in your group and in the blog post?
Why do you think problem-focused descriptors tend to dominate our thinking?
How might this lens influence our expectations, instructional choices, or relationships with students?
Facilitator Note Acknowledge that noticing challenges is part of our role—but reframing allows us to respond more productively.
Moving From Disengagement to Engagement
Discussion Questions
Which of the “starting points” in the post resonates most with you?
Which feels most challenging to implement consistently?
How do you currently identify and name strengths in disengaged students?
Quick Practice
Think of a student you consider disengaged.
Complete this sentence: “I noticed you can… The next step is…”
Share examples in pairs or small groups.
Learning What Matters to Students
Discussion Questions
How well do you know your students’ interests and experiences?
How are, or could be, these interests currently reflected (or not) in your curriculum?
What barriers exist to designing learning around student interests?
Application Activity
Choose one student interest (e.g., sports, music, gaming, social media, the arts).
Brainstorm 2–3 ways that interest could be integrated into your subject area.
Share ideas across groups to build a collective bank of possibilities.
Designing for Re-Engagement
Discussion Questions
What does a “just-right challenge” look like in your classroom?
How do you know when a student is in their Zone of Proximal Development?
What adjustments do you make when learning stalls?
Reflection Prompt
What is one instructional practice you could adjust this week to better support re-engagement?
Commitment to Action
Individual Reflection
What is one small, intentional shift you will try with a disengaged learner?
Optional Share-Out
Invite volunteers to share their commitment.
Consider revisiting these commitments in a future session.
Closing Thought
Disengagement is not a fixed trait—it’s a signal. When we shift our lens from what’s wrong to what’s possible, we create new pathways for learning, connection, and growth.
Let’s start the conversation with Beyond the Apple’s video about teaching students how to listen:
When our students sit up straight, look at the speaker, be silent, and keep hands still and visible, we assume through their posture that our students are listening.
But no . . . effective listening just ain’t that easy.
Yes, some students use “the posture of listening” to truly engage in a learning situation, but:
Some students quickly learn this is a way to “look studious”. They also know that this illusion of engagement reaps teacher praise.
Some students assume the posture of listening but don’t connect the posture of listening with the process of listening – in other words, they hear the words, but do not make meaning beyond the most superficial of levels.
Some students listen best in a relaxed posture, with eyes that alternate between focused on the speaker and roaming around the classroom.
So rather than focusing on teaching the posture of listening, let’s focus on teaching students how to develop and use the active process of listening.
Like all successful lessons, lessons in listening build on what the students know. Beyond the Apple’s Self Assessment of Listening for Students provides an opportunity for students to reflect on their listening. (Feel free to alter the wording of the questions to match the age and language structures of the class.)
Once the self -assessment is complete, discuss the results with the individual student. Look for patterns of responses among the class and develop listening lessons that build listening into every lesson.
Beyond the Apple’s Student Self Assessment of Listening
Think about what each question is asking. Put a dot at a place that’s closest to your answer. For example:
Let’s begins this conversation with Beyond the Apple’s video “Assessing Student Writing Through an Appreciative Lens”.
This video suggests that learning to assess student writing may begin with listening to a student’s writing before seeing a student’s writing. The writing of an elementary student is used, but the assessment practices described below can be used at any grade level.
Here’s the writing sample shown in the video:
This sample was typical of Jo’s writing; as a result, Jo, who was in grade 3, was considered to be “unable to write” and was “on the track” for an Individual Program Plan. We decided to reframe that conversation by viewing the Jo’s writing through an appreciative lens.
We asked Jo to read us her story, but she couldn’t remember it, so we asked her to tell us what she wrote about. She said, “football”. So we gathered a group of teachers together and got to work. We’ll be honest – even with their expertise, “uncovering” the story took some time and effort. But, let me tell you, when Jo’s story emerged, there was excitement in the room! All of a sudden, the un-decodable groups of letters became a lovely little vignette and the assessment of the Jo’s writing shifted from “can’t” to “can”.
Here’s the story:
When I made the perfect catch, it came over my shoulder and I dived and caught it. And I got the touch down.
Once we uncovered the story, we followed these steps, which demonstrate how to assess student writing with an appreciative mindset.
We asked a series of questions about the student’s writing, The questions were designed as an analytic assessment of the Traits of Writing.
We answered each question, beginning with an observation of what Jo accomplished.
We used this information to develop feedback to Jo, which started with an acknowledgement of what was accomplished, such as “I noticed that you . . . “ or “Your story created a picture about . . . “ or “These are interesting words . . . “
We provided a Jo with a suggestion about the what the next steps of instruction would include.
Here’s what that process looked like. Needless to say, not all of these suggestions will be implemented the next day. The teacher decides which next steps teaching will provide the most gain, plans an engaging lesson and then watches for evidence of learning. Chances are, one lesson will have “spill over” and success will be evident in more than one area.
1.QUESTION:By definition, writing is a means to convey thoughts through text. Does Jo understand how to convey his thoughts through text?
ANSWER: Yes, Jo knows that thoughts can be shared as words and words are conveyed through groupings of letters that are placed on a page left to right and top to bottom.
FEEDBACK TO STUDENT: Acknowledge a detail or details in Jo’s writing.
NEXT STEPS SUGGESTION: Tell Jo that her writing creates a picture and for the next few lessons, he’ll get even better at using his writing to create pictures.
2. QUESTION: Does Jo have an idea and is he able to support that idea with relevant details?
ANSWER: Yes. The student’s focus is her perfect catch and he provides the reader with relevant details.
FEEDBACK TO STUDENT: Share your delight in the story and ask some questions that would provide additional information about the time, location, and what happened after the touchdown
NEXT STEPS TEACHINGSUGGESTION: Tell Jo that the next lesson will be about how to extending ideas to include more detail.
3. QUESTION: Does Jo share her ideas in an organized way?
ANSWER: Yes, the story is clearly sequenced from beginning to end.
FEEDBACK TO STUDENT: Acknowledge the beginning, middle and end of the Jo’s story and how this flow helped you to picture the events happening. “Map” the ideas on a graphic organizer.
NEXT STEPS TEACHINGSUGGESTION: Tell Jo that she can include more ideas in his story by using a planning template (a graphic organizer focussed on organization).
4. QUESTION: Does Jo demonstrate an understanding of how ideas flow together in a variety of interesting sentences?
ANSWER: Yes. As we listen to the story, it’s clear that Jo has two distinct sentences.
FEEDBACK TO STUDENT: Discuss the Jo’s opening sentence “When I made the perfect catch . . . ” as an interesting and engaging beginning to this narrative.
NEXT STEPS TEACHINGSUGGESTION: Suggest that Jo start a collection of his best opening sentences. His first entry can be “when I made the perfect catch” and he can look through his own writing to find samples of other powerful opening sentences. Over time, this can be extended to closing sentences, sentences indicating a mod change, a time change, etc.
5. QUESTION: Does Jo use a variety of words and phrases that allow the reader to become engaged in the story and visualize the actions?
ANSWER: Yes. By using the words “the perfect catch” at the beginning of the story, and then elaborating on this with “over my shoulder”, “dived and caught it”, and “touchdown”, Jo provided all the clues we needed to tell us she was playing football.
FEEDBACK TO STUDENT: Read Jo’s story aloud and chat about how Jo’s use of words worked as “clues” to the story.
NEXT STEPS TEACHINGSUGGESTION: Find a favourite story and read it aloud to Jo. As the story unfolds, search for interesting words and phrases that provide clues to the story. Follow up lessons can include searching in fiction and nonfiction text for words that create impact.
6. QUESTION: Does this student use the conventions of a) spelling, b) capitalization, c) letter formation and d) punctuation
a) CONVENTIONAL SPELLING
ANSWER: Some words are spelled correctly (I, the, it my, and, the). Jo’s misspellings (when, made, perfect, came, cot, got) are close approximations that indicate Jo has a developing awareness of sound symbol correspondence.
FEEDBACK TO STUDENT: Point out the correctly spelled words to Jo and how they helped the reader to understand the message.
NEXT STEPS TEACHINGSUGGESTION: Find a “close to conventional” word or two and tell Jo that he was able to sound these words out, but they’re still a bit foggy. To clear up the fog, teach Jo how to check his spelling. Don’t expect checking of all words, just the ones that Jo finds interesting or will use a lot. While Jo is learning to check, provide lessons in spelling patterns.
b) CAPITALIZATION:
ANSWER: The answer to this is unclear, as Jo’s use of capitals appears to be random.
FEEDBACK TO STUDENT: Have conversation with Jo about the use of capital letters and gather information about what he knows.
NEXT STEPS TEACHINGSUGGESTION: Refer to the conversation above and demonstrate how to put what Jo knows about capitals into action. If knowledge of capital letters is limited, begin with the first letter of a story.
c) LETTER FORMATION: (NOTE: letter formation is more important in some areas than in others; we’ve included it here to ensure there’s a comprehensive look at early writing conventions)
ANSWER: It’s clear what each letter is intended to be, but there is variance in size and spacing.
FEEDBACK TO STUDENT: Tell the student that you know what each letter is, but reading his story would be easier to write and to read if letters were of a similar size and were on the line.
NEXT STEPS TEACHINGSUGGESTION: Ask Jo to look through a variety of texts with varying fonts and sizes. Ask Jo to search for patterns of font sizes and regularity of shape. NOTE: There comes a time when we have to stop insisting on tidy printing. In Jo’s case, conventional use of capitals and punctuation will have more impact than size and shape of letters.
d) PUNCTUATION: It appears the student is aware that periods (full stops) are used in story writing, but whether or not he understands the the purpose and location of their use is unclear.
FEEDBACK TO STUDENT: Point out Jo’s use of full stops and ask Jo why and when they’re used.
NEXT STEPS TEACHINGSUGGESTION: Refer to the conversation above and demonstrate how to put what Jo knows about full stops into action. If knowledge of how full stops are used is limited, read Jo story aloud and demonstrate how a period allows us to pause and think about what we’re read.
Does this process require a lot of time? Yes – at least at first. But after a few of these focused sessions, the responsibility for monitoring and revising is increasingly released to the student. Remember . . . a student who is struggling is the student who needs us the most, so it’s worth the time.
search for and share evidence of “the known” within the student’s misunderstandings
provide the student with a focus for the next steps of learning
Here’s an example of a very simple template used to gather and record this information during your conference with a student. Sharing the information ensures the student is aware of progress and has a sense of what’s coming next. It also provides an ongoing record of student progress that is useful for you, the students and the parents.






 .
.


Meaningful Feedback in Minutes
The purpose of feedback is to:
Here’s an example of a very simple template used to gather and record this information during your conference with a student. Sharing the information ensures the student is aware of progress and has a sense of what’s coming next. It also provides an ongoing record of student progress that is useful for you, the students and the parents.
For more conversations about education, please visit: Beyond the Apple . . . Reframing Conversations in Education .
Share this: